The Origins and History of Mosaic Puzzles
The journey of mosaic puzzles began centuries ago. Its roots trace back to ancient civilizations like the Romans and Greeks. They used small colored stones, pieces of glass, or ceramic to create intricate designs. These designs often told stories or depicted gods and natural scenes. During this time, mosaics were more than just art – they were a form of expression.
As time progressed, mosaic art evolved. In the Renaissance, artists brought a new level of detail to the craft. They played with light and shadow to create more lifelike images. By the 18th century, Europe saw the rise of the parquetry and marquetry forms. These involved inlaying pieces of wood, creating a puzzle-like effect. Yet, these were still distant from what we today recognize as mosaic puzzles.
The modern mosaic puzzle concept emerged in the 19th century. It began as a popular educational tool for children. These puzzles were used to teach geography, history, and art. They combined learning with the pleasure of creating tangible artwork.
Across the globe, various cultures have contributed to the evolution of mosaic puzzles. For instance, traditional Islamic art embraced geometric patterns. These patterns have influenced modern mosaic puzzle designs. In Eastern cultures, mosaic artwork often involves nature themes. This inspires many of the nature-based mosaic puzzles we see today.
From their rich past, mosaic puzzles have become loved hobbies across the world. They blend art, history, and the satisfying challenge of puzzle-solving. Understanding their history enriches the experience of crafting your own mosaic puzzle.

Essential Materials Needed for Mosaic Puzzle Making
Before venturing into the world of mosaic puzzles, gathering the right materials is crucial. These essentials will ensure a smooth and enjoyable puzzle-making process. Here’s a list of key items you need to start creating your own mosaic artwork.
Base Material
Your mosaic puzzle needs a sturdy base to serve as the canvas. Common choices are wood, glass, or a firm mesh. Each material offers a different look and feel for the final piece.
Tesserae
Tesserae are the small pieces that make up the mosaic. These can be glass tiles, ceramic pieces, stones, or even beads. Colors and shapes vary, offering limitless possibilities for creativity.
Adhesive
A strong adhesive is vital to keep tesserae in place. Options include thinset mortar, PVA glue, or epoxy, depending on the base material and tesserae type.
Grout
Grout fills the gaps between tesserae and gives a professional finish to your mosaic puzzle. You can choose from a wide range of colors to complement or contrast your design.
Cutting Tools
To shape tesserae to your design, you’ll need cutting tools. Nippers or tile cutters are best for glass and ceramic, while a saw might be needed for tougher materials.
Gloves and Safety Goggles
Safety should always come first. Wear gloves to protect your hands and goggles to safeguard your eyes while cutting and handling tesserae.
Sponge and Cloth
For cleaning excess adhesive and grout, a sponge and soft cloth are necessary. They help in achieving a clean and polished look.
Collect these materials and you’re set to begin your journey into mosaic puzzle making. With these at hand, you can focus on the art and not worry about missing a crucial component.

Choosing the Right Mosaic Puzzle for Beginners
Choosing the right mosaic puzzle can be daunting for beginners. It’s important to start with a project that’s manageable, yet still offers a chance to learn and grow your skills. Here are some factors to consider when selecting your first mosaic puzzle:
Complexity
Opt for a design with larger pieces and a clear image. This will make it easier to handle the tesserae and understand where each piece fits.
Size
A smaller puzzle is less overwhelming and requires fewer materials. It’s a great way to practice before tackling larger pieces.
Materials
Begin with standard materials such as ceramic tiles or glass pieces. These are readily available and allow for straightforward cutting and placement.
Design
Choose a simple pattern that doesn’t have too many intricate details. Patterns like geometric shapes or simple flowers can help you master the basics.
Kit Options
Consider starting with a mosaic puzzle kit. These kits contain pre-cut pieces and instructions, perfect for learning the ropes.
Learning Resources
Ensure the puzzle comes with a guide or you have access to tutorials. Good guidance can be a game-changer for your first mosaic puzzle project.
Keep these tips in mind, and you’ll be well on your way to choosing a beginner-friendly mosaic puzzle. With the right project, you can build your confidence and enjoy the creative process from start to finish.

Step-by-Step Instructions on Creating Your First Mosaic Puzzle
Creating your first mosaic puzzle may seem challenging, but with these step-by-step instructions, you’ll find it a satisfying and creative process. Here’s how to start and complete your very own mosaic artwork:
Choose Your Design
Pick a simple, yet appealing design for your first project. It should be easy to distinguish the larger areas of color or pattern.
Prepare the Base
Cut your base material to the desired size. Ensure it’s clean and dry before you begin.
Arrange Your Tesserae
Lay out your tesserae according to your design. Play with colors and shapes until you’re happy with the layout.
Apply Adhesive
Spread a thin layer of adhesive onto a small section of the base. Position your tesserae gently yet firmly onto the adhesive.
Continue Placing Tesserae
Work in sections, applying adhesive and tesserae. Remember to leave a little space between pieces for grout.
Let the Adhesive Set
Once all pieces are in place, allow the adhesive to cure. Follow the manufacturer’s recommended time.
Apply Grout
Spread grout over the tesserae, filling the gaps. Be sure to wipe off any excess.
Clean the Surface
Once the grout has slightly set, clean the surface with a damp sponge. Polish your mosaic with a cloth after it dries.
Seal the Mosaic
Apply a sealant to protect your mosaic puzzle from moisture and wear. Allow it to dry.
By following these steps, you can create a beautiful mosaic puzzle that you’ll be proud to display. The process is not only about creating art, but also about enjoying the journey of crafting something unique with your own hands. Remember, patience and practice are key to mastering mosaic puzzles.
Tips and Techniques for Assembling Mosaic Puzzles
As you embark on assembling mosaic puzzles, embrace these tips and techniques for a smoother experience.
Start with a Plan
Before gluing, lay out your design. A clear plan helps avoid mistakes.
Sort Your Tesserae
Organize pieces by color and shape. This saves time during assembly.
Work in Sections
Tackle the puzzle in smaller areas. This makes placement more manageable.
Check Adhesive Consistency
Your glue should be neither too thick nor too runny. Test it on a spare piece.
Apply Even Pressure
Secure tesserae with consistent pressure. This ensures they stick well without shifting.
Use Spacers for Uniformity
For even gaps, spacers can be key. They make grouting easier later on.
Keep a Damp Cloth Handy
Quickly wipe any excess adhesive. It prevents a messy look.
Take Your Time
Don’t rush the process. Good placement takes patience.
Take Breaks
Rest your eyes and hands. Frequent breaks help maintain focus.
Enjoy the Process
Relax and enjoy. Remember, creating mosaic puzzles is a fun hobby.
Following these tips can significantly enhance your mosaic puzzle-building experience. Remember, practice is essential. The more puzzles you craft, the better you become at it.
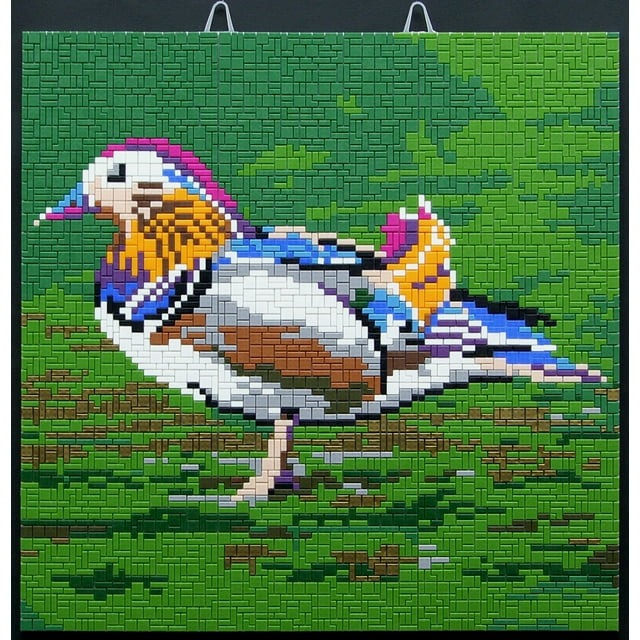
The Role of Color and Texture in Mosaic Puzzles
Color and texture are vital in mosaic puzzles. They bring depth and life to your work. Think of color as a storyteller in your mosaic project. It can create mood, highlight areas, and form a sense of harmony. To master the use of color, consider these points:
- Understand Color Theory: Learn how colors interact. Use a color wheel to see how complementary colors work together.
- Create Contrast: Use contrasting colors to make certain parts of the puzzle stand out.
- Use Color Gradation: Gradually change shades to show depth and dimension.
Texture also plays a key role. It gives a tactile quality to your mosaic. It helps create visual interest. Here are tips to include texture in your mosaic puzzles:
- Mix Materials: Combine smooth and rough tesserae. This adds a varied feel.
- Vary Piece Size: Use different sizes of pieces to create texture.
- Consider Relief: Layer tesserae to give a 3D effect.
Choosing the right colors and textures can transform a flat image into a vibrant piece. As you plan your mosaic, experiment with various combinations. This will enhance your puzzle’s visual appeal. Remember, in mosaic puzzles, color and texture are as important as the design itself.
Finishing Touches: Grouting and Sealing Your Mosaic Puzzle
After assembling your mosaic puzzle, the finishing touches are crucial. They not only enhance the puzzle’s appearance but also protect it for years to come. Here are simple steps to grout and seal your mosaic artwork:
Apply Grout Properly
Choose a grout color that complements your design. Mix the grout according to package instructions. Apply it over the tesserae, pressing into gaps. Ensure all spaces fill up for a uniform look.
Clean the Tesserae Surface
After grouting, wait for a slight set, typically 10 to 20 minutes. Then, gently wipe the tesserae with a damp sponge to remove excess grout. Be careful to not disturb the grout in the gaps.
Let the Grout Cure
Allow the grout to completely dry, following the manufacturer’s recommended time. It may take 24 to 48 hours. Keep the mosaic in a dry, safe place. This ensures the grout sets well.
Seal the Grout
Once dry, apply a sealer to the grout. This protects it from moisture and staining. Use a small brush for precise application. Be sure to cover all grout lines.
Buff the Tesserae
After sealing, polish the tesserae with a soft cloth. This will remove any haze left by the grout or sealer. Your mosaic should now shine.
By grouting and sealing your mosaic puzzle, you guarantee its longevity and beauty. These final steps are essential in mosaic puzzle craftsmanship and are just as important as the initial assembly process. With your piece grouted and sealed, it’s ready to be displayed and admired.
Displaying and Caring for Your Completed Mosaic Artwork
After your hard work and creativity, displaying your completed mosaic puzzles is a thrilling moment. Here’s how to do it right and ensure they remain as stunning as the day you finished them.
Choosing the Right Display Location
Select a spot where your mosaic can get the attention it deserves. Avoid direct sunlight, which can fade colors over time. An area with consistent temperature helps prevent damage. Remember that places with high humidity can weaken adhesives.
Mounting Your Mosaic Puzzle
If your mosaic is on a firm base, you might hang it like a picture. Use proper mounting hardware that suits the weight of your artwork. For heavy pieces, secure hooks or wire to the back and ensure they’re attached well.
Cleaning Regularly
Dust your mosaic gently with a soft brush or cloth. For deeper cleans, use a slightly damp cloth. Avoid harsh chemicals that could damage the tesserae or the grout.
Inspecting for Repairs
Over time, pieces might loosen or grout could crack. Inspect your artwork regularly. If you spot issues, repair them quickly to stop further damage. Use a little adhesive to fix loose pieces and fill cracks with fresh grout.
Protecting from Wear and Tear
Display your mosaic in a place with less traffic to minimize the risk of bumps or scratches. If the mosaic is on an item used frequently, like a table, consider a glass cover to protect it.
Remember, each mosaic puzzle is a piece of art. With the proper display and care, your mosaic puzzles can continue to tell their stories for years to come. Treat them with love and attention, and they will remain vivid and intact as treasured parts of your home.